Anytime you grow a tomato in the garden, it’s an absolute joy. From the tiny little seedling to the bright red fruit, it can be rewarding. However, as every gardener knows, disease and pests can put a wrench in your efforts to harvest a healthy fruit. One area not talked about enough is when the tomato leaves start yellowing. But what exactly causes yellow tomato leaves?
Yellow tomato leaves are caused by improper watering in most cases. Lack of nutrients in the soil and an imbalance in ph levels can cause this too. Soil-borne fungus such as Septoria leaf spot can also be a major cause of yellow tomato leaves.
So as expected, yellow tomato leaves are a big no-no when it comes to a healthy plant. We want those vibrant greens from start to finish. Having grown many tomatoes myself, I can share some tips on properly growing tomatoes and dealing with yellowing leaves if the problem arises. Read on and learn more about what you can do too!


8 Causes Of Yellow Tomato Leaves
While yellow tomato leaves are a disappointing sight for any gardener (especially if you’ve got an older plant that’s producing), it’s not all that uncommon. In fact, there are several reasons it may be happening, and in most cases, it’s preventable as long as you can identify what the cause is. Here are eight reasons your tomato leaves are yellow and a few helpful tips to fix the problem.
Too Much Or Too Little Water
The leading cause of yellowing in tomato leaves, at least in my experience, is improper watering. This can mean overwatering and underwatering. Both can have an effect and are highly dependent on the season.
For example, you’re more likely to perform the overwatering phase when it’s the summer and the soil drys out quickly. Likewise, you can also underwater if you’re not paying enough attention to how your plant responds.
A typical tomato plant needs around 1 to 2 inches of water per week. You may want to increase that to at least double in the summer when temperatures are blazing.
Keep in mind that container soil is going to heat up much quicker than if your tomato is an in-ground plant. In that case, this leads to more evaporation. So, more water is needed.
When overwatering causes yellow tomato leaves, it’s usually a response to the roots not having suffocating. This means less overall oxygen in the soil itself, and that’s almost always caused by root damage. Because those leaves don’t have enough oxygen, the natural response of your tomato plant is to yellow the leaves.
With underwatering, it’s a similar reaction. You’ll most likely see the leaves wilt or even droop a bit before the color goes from green to yellow. Eventually, the entire leaf will drop off the plant. Tomato plants require leaves to grow, so we definitely can’t let this happen!
The easy fix for all this is to set up a proper watering schedule. Tracking the days you water and amounts can help you avoid returning to the plant too often or too little.
If it’s a situation where the plant needs more water, then I suggest doing this in the morning or evening. Most evaporation happens in the late morning through afternoon, so this makes the most sense.
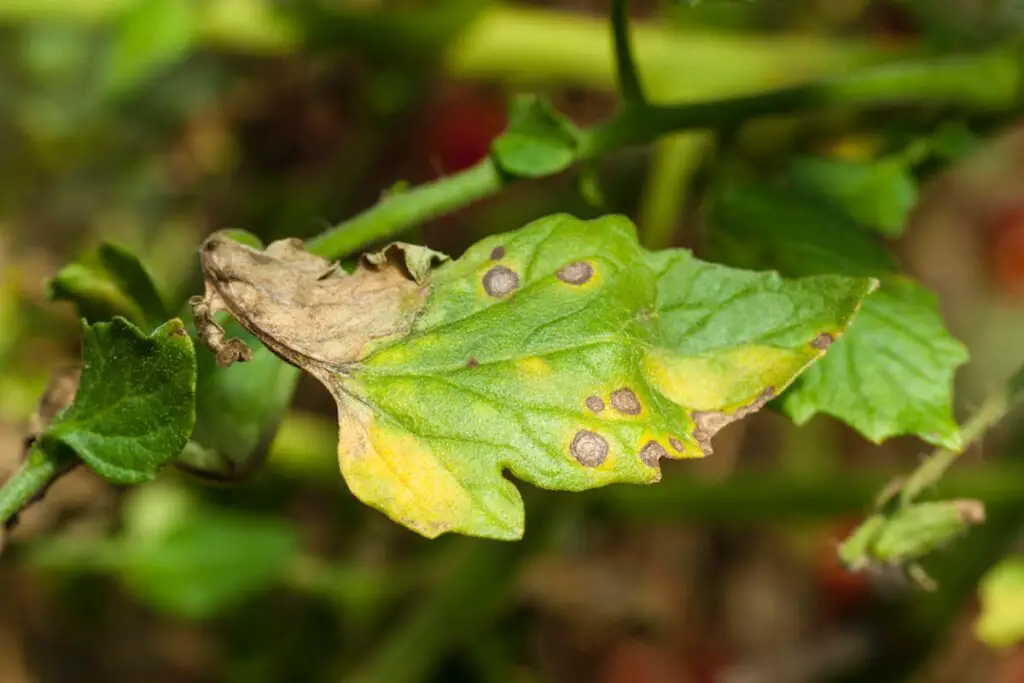
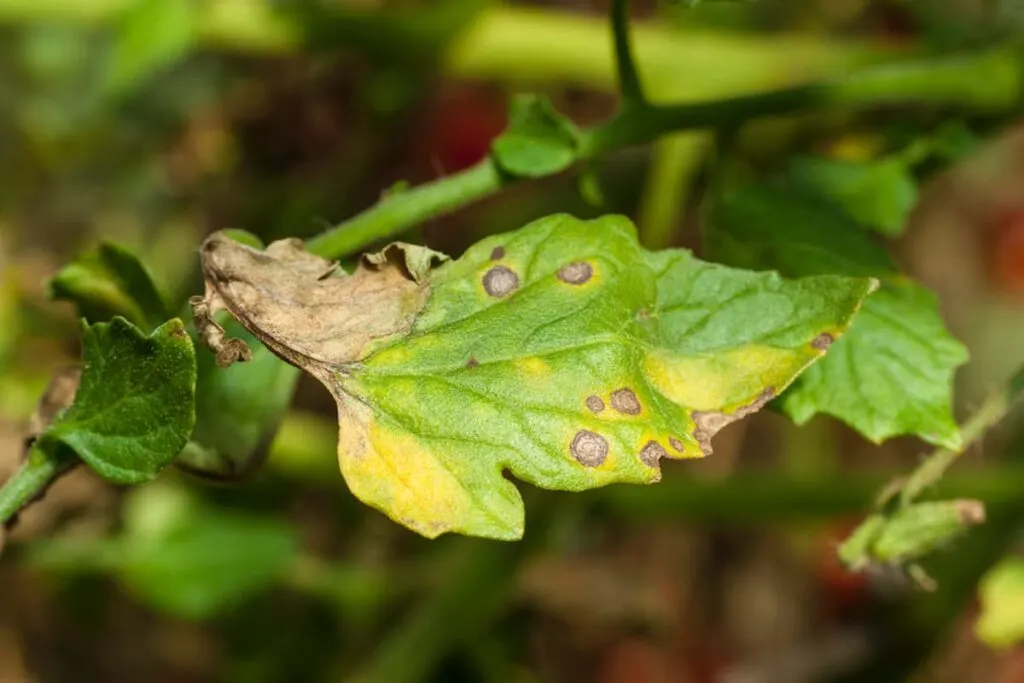
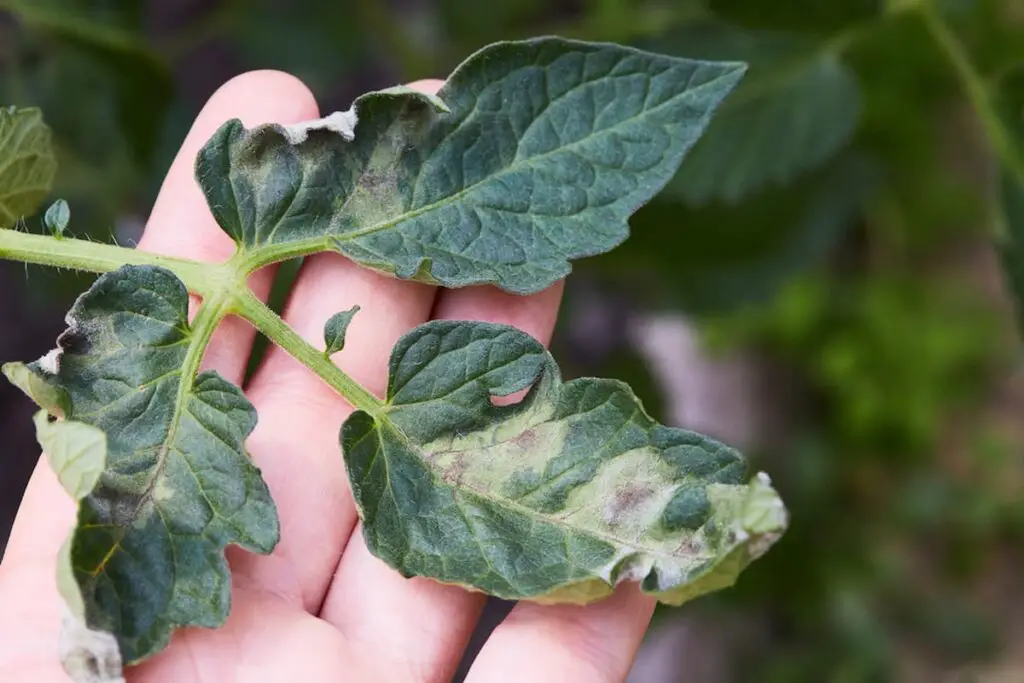
Septoria Leaf Spot
Leaf spot is a real problem for some gardeners. It can not only cause those nasty little dark spots to form on the leaves, but it can also yellow them and cause them to dry up and fall off, sometimes in droves.
The worst part about leaf spots is that the disease can easily spread across the entire plant. This includes the stem too. It comes from a fungus in the soil. However, Septoria leaf spot is commonly seen in areas where wet and humid weather is a constant.
The more extended periods your plant is under those conditions, the more likely this fungus will develop in the soil.
Your next question may be, should I remove yellow leaves from tomato plants? In short, yes, you should remove yellow leaves from tomato plants, especially if a disease is causing it. Using a pruning tool works best. However, be careful to sanitize your cutting tools. It’s very easy for diseases like this to spread throughout the plant all by contact.
Because the disease spreads so easily, you’ll want to make sure plants nearby are spaced further away.
In most cases, this can be fixed with a fungicide spray. Another preventative is to apply the fungicide early before anything happens. You can safely do this in the seedling stage and then apply it every 7-14 days throughout the growth process. For more severe cases, every 7 – 10 days works best.
Although most fungicides contain organic ingredients such as copper and potassium bicarbonate, you may not want to spray something like that in your garden. The good news is that there are several home remedies you can also try.
Ingredients that work for controlling yellow leaves caused by Septoria leaf spot include mixing baking soda with a bit of water and dish soap. You can also add vinegar and neem oil.
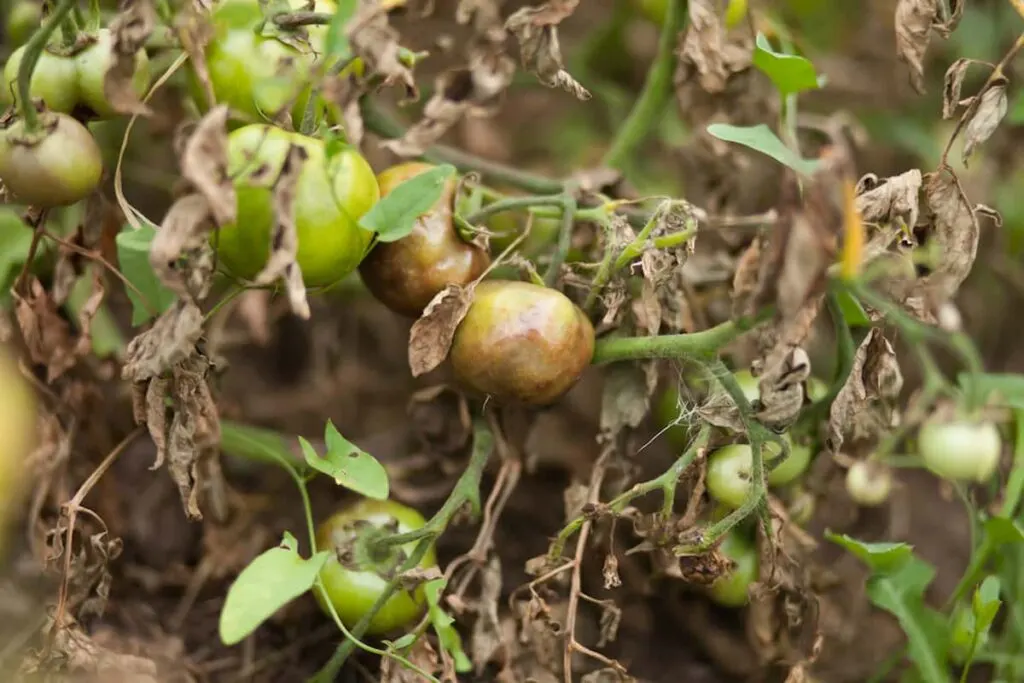
Early Blight
Another common disease in tomatoes is early blight. It comes from the soil itself, and it’s a fungus. Most gardeners will see this occurring on the lower leaves of the tomato plant. Because of that, it doesn’t get lost in all the rest of the foliage.
The leaf will go through a few stages here. It starts with a yellow spot here and there, but eventually, it’ll start to brown along the edges. Eventually, the entire life is compromised and turns yellow, dries up, and falls off the plant.
Much like septoria leaf spot, a fungicide spray is the easiest method to fix the problem. Remove all the leaves first, though!
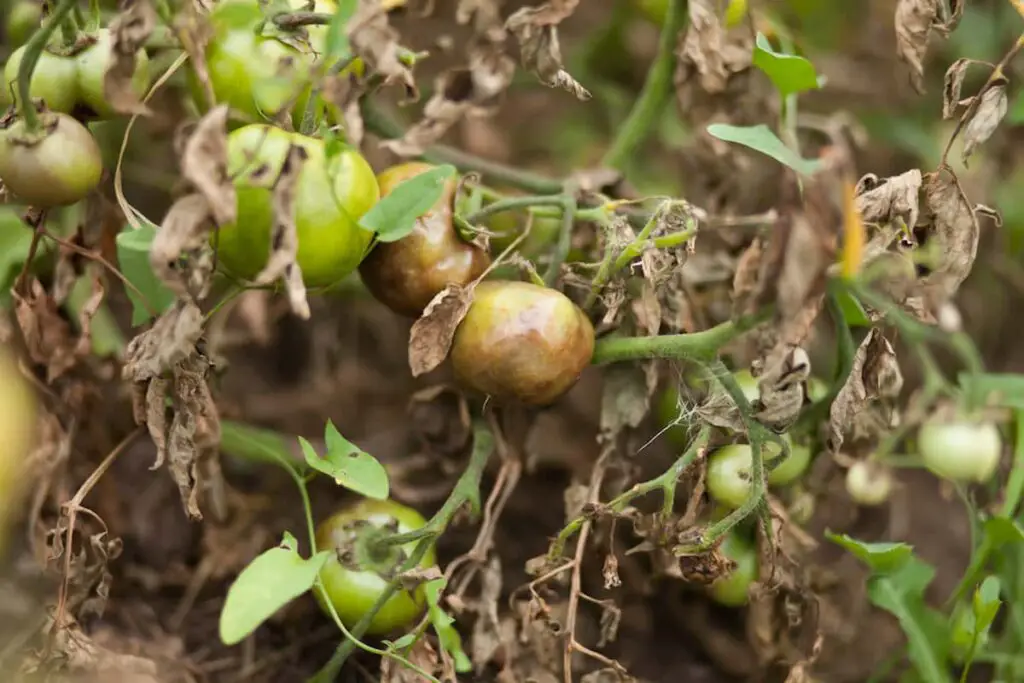
Wilting Disease
Wilting diseases in tomato plants is never a good sign. Mostly because it’s hard for tomatoes to come back from that. Below are three types of wilt you may see with tomato plants:
- Verticillium wilt
- Bacterial wilt
- Fusarium wilt
All three of these wilt diseases can cause yellowing of the leaves. Fusarium, for example, begins in the soil and quickly travels up the plant through the root systems. It cuts off the plant’s ability to transfer water through the plant. As a result, the leaves will wilt, change color, and then eventually die off.
Verticillium has a similar effect. The lower leaves will have a pale yellow color, and then brown spots will develop.
Your Plant Is Still Young
The age of a plant can also play a factor in what color the leaves are; for that reason, it’s not that uncommon to see yellow leaves in the seedling stage. This, however, is concentrated on a particular set of leaves, the cotyledons.
Those are those first small leaves you see on seedlings in the first couple of weeks. You can pull those off once they start yellowing, although they’ll drop off on their own with time.
Lack Of Drainage
If you’re overwatering, the leaves will most certainly turn yellow, especially if the soil is compacted and there’s a lack of drainage.
When you think about it, compact soil heavily reduces the aeration, so the roots have a tough time breathing. Eventually, this will damage the root systems as a whole, and the plant will suffer.
Not only could the leaves turn yellow, but basic nutrients, water, and oxygen will have a very tough time traveling through the entire plant.
It’s not an easy fix when this happens and, in most cases, may require a transplant. With that may come to some transplant shock, but not so much so if the plant is more established and past the seedling stages. The more developed the roots, the more wiggle room you’ll have to try your hand at loosening up the soil yourself.

The best approach is, to begin with, the proper soil so you won’t need to do any extra transplanting. You’ll want to make sure the plant is in soil that is loose, has some vermiculite, and that the soil has plenty of healthy organic matter in it.
If you’re using containers, there is a possibility that the drainage holes are not large enough. Drill a few more in the bottom, or widen the holes that are already there.
Compact soil is less common in container gardens and raised beds (unless you’re using a ton of compost or in-ground soils inside of those containers). In-ground tomatoes may be more at risk of this, mainly if it’s an area that is traveled over often either by foot, wheelbarrow, or other objects.
Transplant Shock
So, I mentioned transplant shock earlier, but it really can do a number on your tomato plants if you’re not careful. For seedlings, transplants are always risky. It’s usually caused by not handling the roots carefully enough, exposing them to light, and lacking water after the transplant.
The yellowing of the leaves is mostly your tomato plant responding to its new conditions. For example, if you started your seedlings indoors and moved them outdoors, they’ll need a few weeks to adjust to the new temperatures, the wind, and other outside elements.
Also, because the soil is new with its own NPK ratios, your plant will be responding to this as well.
In most cases, the yellow leaves will be present on the bottom of the plant. The phase will eventually pass. However, if you’re worried about the transplant shock, you can remove those lower leaves so the tomato plant can focus its energy elsewhere. Especially with new seedlings, new growth is an integral part of its development.


Insufficient Nutrients
The NPK levels of tomato plants are incredibly important. If the ratio is off, the plant could respond poorly and start to have problems.
In the case of yellow tomato leaves, the nitrogen levels are usually what’s off. Lack of nitrogen can cause some of the leaves to turn yellow, particularly the older ones. Because plants prioritize new growth, you’re less likely to see those experiencing this problem.
Potassium deficiency can also be a cause of yellowing in tomato leaves. In this case, the outer edge of the leaf is the first part to start yellowing. Eventually, the leaf will start to turn brown, dry out, and fall off.
In addition to low nitrogen, a tomato plant needs the following micronutrients in order to function:
- Magnesium
- Zinc
- Sulfur
- Iron
All of those are important for photosynthesis. If your soil lacks significantly in any of those areas, you’ll see more than just yellow leaves. The plant as a whole will stop growing.
So, naturally, the easy fix is to add all of those nutrients back to the soil! It’s easy to do with an all-purpose fertilizer. Dr. Earth has a great vegetable and herb blend with a 4-6-3 NPK ratio that works well for tomatoes.
You can also add some everyday items into the soil too. Things such as coffee grounds, leftover food scraps, and more. If it’s a nitrogen deficiency, fish emulsion works perfectly, but be careful not to add too much so your plant won’t’ experience burnt leaves.
Also, keep in mind that the more nitrogen you add, the more leaves will develop. However, there is a limit, and too many flowers will lead to your tomato plant not producing fruit.
Out Of Season
The growing season for tomatoes is an essential factor in common problems, especially with yellow leaves. That’s a natural part of the entire sequence. The yellow leaves can signal the end of production. Along with that will be less fruiting, less flowering, and overall slow growth in the plant.
It’s best to cut any remaining leaves that have yellowed and dried up. This will encourage the plant to focus its remaining energy on ripening the fruits that are there.
Final Thoughts
If your tomato leaves turn yellow, you know what the two main causes are. It may be a watering problem, but more than likely, its a nutrient deficiency (unless you have a sensitive tomato variety)
Because nutrient deficiencies aren’t always easy to tell, a soil test is the best way to know what’s happening down there by those roots! You can easily purchase one at a local Lowes and get an immediate analysis of the ph levels of your soil.


Hi there, my name is Allie and welcome to my blog; GareningWithAllie!
Much of what you see written here is just our personal experiences with gardening. Along with the content I write here, there is also a unique collection of gardening topics covered by some of our close friends. I hope you find everything you read here to be helpful, informative, and something that can make your gardening journey the most lovely experience ever! With that said, Happy Gardening!